|
How to Draw Grass in Oil Pastels
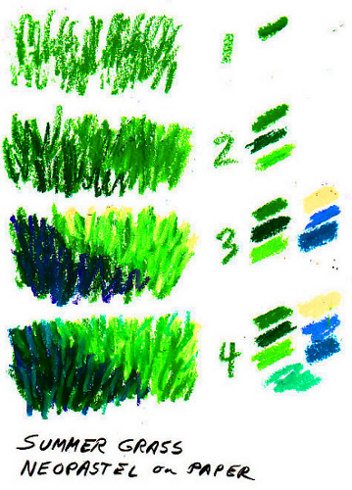
Someone on an art forum I visit regularly asked how to draw grass. So naturally I did a short demo drawing showing my favorite texture for lawns. To me short clipped grass is much tougher than doing long waving grass with occasional flowers to vary the monotony. If you're doing urban landscapes with parks, fountains, suburban homes or townhouses, you'll need to draw grass. A bright green lawn may even cover a substantial area of your painting. How to give that lawn a good texture with some variations in color and shading is tricky. I've come up with a method of layering gestural texture strokes in different hues and values that blends together over large areas to give the impression of short-clipped grass. Below I'll break down this big demonstration step by step and describe both what I did and why I chose those specific colors to draw grass.. All of my examples are done in Caran d'Ache Neopastel (a good artist grade oil pastel with a firm, creamy texture) on moderately heavy 70lb white sketchbook paper. If you use tinted papers or sanded papers or boards, you can still get these effects and any light strokes will create attractive broken color -- the first stage may look nice by itself if you're using a mid-dark green paper.
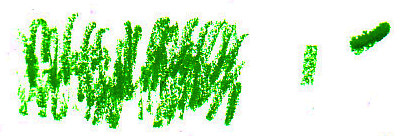
Step One: Monochrome Grass Texture
How to draw grass begins with a bright grass green in a middle value. If you look at a ten stage value scale like the one in my Shading lesson, compare all the greens in your set to the Gray Scale Value Finder on screen (or purchase one so that you have it convenient off screen, it will be even more accurate.) Find a bright medium green that's about value 5 or 6. If you have a gray scale value finder offline, make a color chart of your pastels. Look at the green through the hole in each of the gray patches. Squint until you can't see the color. If the green's a 4, 5 or 6 it's probably about right for your base grass color for summer grass in the sun. If you want to draw brown, dry grass, start with a gold oil pastel or olive green about that value. If you want dried or burned patches in the lawn, just use browns and golds more heavily in some of these stages. The texture is the same, your color choires will depend on exactly what lawn you're painting. My first layer is just rows of short jagged strokes. On clipped grass I do zigzag them making each stroke between four to six line widths long. Lift your pastel up and down as you scribble the first texture in, varying the pressure. Some broken color is fine, some heavy areas are too. It does not have to be perfect. In fact, the less perfect and regular your strokes are, the better you can draw grass. Every blade goes off in a different direction. Some grass blades are bent or broken, this is how the zig-zag effect creates a more believable lawn. For very long grass, don't zig zag. Instead do slightly curving strokes all starting at the base and leaning slightly in the direction of the wind or radiating in clumps. To draw grass whether short or long, start at the top and slowly work your way down overlapping rows. Don't make the rows perfectly regular with a ruler either, have some strokes start a little higher or lower. Get loose and play with it. Work back and forth till the entire grass area is filled with Step 1 grass texture in your middle value basic grass color.
Step Two: Add Light and Dark Values
Step Two creates a simple type of grass texture. If you're working on a colored paper that's dark green or gold, this may be all that you need in a simple sketch. Keep in mind that on toned grounds you can trail off the most heavily worked grass textures close to the focal point (say, the house) and then gradually leave areas of these early stages visible trailing out to the last sketchiest version of Step One to vignette the drawing with the paper showing. That can be a beautiful effect on any mid value toned surface, whether it's colored artist paper, sanded Colourfix paper or gessoed canvas board. If you are looking to cover the entire surface of the painting then yes, you can use all four stages all the way through the grass area. Sometimes it's nice to keep things simple though. I used a darker, slightly bluer green in the shadow area to define it. Use the same strokes that you did to draw grass in the first stage, but using the second colors. In the sunlight, I added a bright green-yellow to lighten it and fill some of the spaces where the paper showed. On white paper I do like to cover the entire surface with oil pastel most of the time. So the full process here is carried to where there shouldn't be any specks of white when you're done. Just remember that on toned or colored supports, the surface itself is usually attractive enough to leave it showing here and there. If you have an underpainting you don't need to be as careful about covering every speck. This step two texture would work by itself in a loose sketch, especially if you're out painting plein air and want to fill in the grass texture quickly to establish areas of color and value. The shadows are strong in my example, implying a bright clear day. On an overcast day you might not even see shadows or if you do, they might not be as far from the middle value. Pay attention to observing the real lawn whether you're looking at a photo, or better still, painting from life. The exact hue of grass will change depending on time of day, local weather, time of year and latitude. Lawns closer to the equator, say a well-watered Florida lawn, will be much brighter green than you'll see up in New England. Just give the shadow areas a second layer in darker, bluer green and sunlit areas a second layer in lighter yellower green for summer sun on a well clipped lawn.
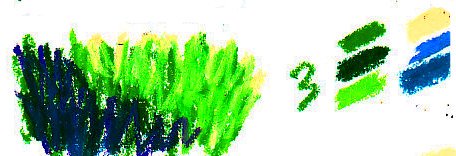
Step Three: Intensify Color and Values
In my example for how to draw grass, I decided that stage two was still too close to monochrome. So I reached for more of the spectrum bright colors in my set of Neopastels and decided to get a little daring. Violet in the shadow area turned out to be a little too strong, so I added a layer of blue with it to connect it with the dark green. In the sunlit area, I went over it still using the same short choppy zigzag strokes with a light earth yellow, something like Naples Yellow. Lemon Yellow would have worked too or any light yellow. You can draw grass entirely in yellow, golds and browns if it's dry or worn down. Where it went over green, the yellow mostly just lightened it and shifted it toward yellow. But where it filled in white specks or I used heavy pressure, it became nice light yellow accents as if the sun was striking bent grass blades. Overall, the effect of contrasting light and dark became too intense at Stage Three, but by varying the hue. See Color Theory to understand how hues (what color it is) affect the colors next to them in painting. I liked what the broader range of colors did for my example of how to draw grass. It would fit very well in an impressionist painting of a lawn. However, the values got too extreme and the combined colors pulled too far away from our original medium grass green. In the final stage, we'll adjust the colors so that they match my memory of our bright summer lawn here in Arkansas, where the sun shines a bit warmer than in the Midwest and the moist climate kept every lawn a brilliant emerald whether it was mowed often or not.
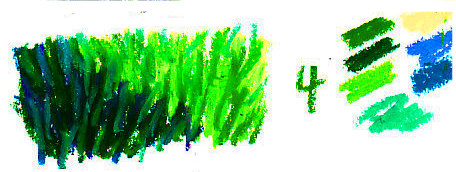
Step Four: Adjust Color and Value
To finish your example of how to draw grass, go back to the medium green we used at the start. Add some loose strokes into the sunlit area of grass. Space them individually and don't zigzag this time, these are accents to make the area darker and show different blades in shadow behind the lighter ones. Don't use too many. Use the same medium green over the dark blues, greens and violet in the shadow area. It's still too dark, so pick out a light blue-green or aqua about as light as the medium green or the yellow green, not as light as the yellow. Dash in some individual highlights in the shadow area the same way you did the medium green accents in the light area. The result is about as contrasted as Step Two again. It's become much richer for adding more different hues and contrasting values within each area. The highlights in the shadow area are darker or the same as the darks in the light area. For very contrasted areas, make sure highlights in the shadows are darker than the shadows in the light. That's an old illustrator's trick to make light look more intense, but it's not usually needed in summer shadows on a lawn because sunlight will reflect from everything else into the shadows. You can use some complementary colors in the grass textures, especially if you're doing grass that has some burned areas. Warmer russets and golds can help mute the grass, just don't overuse them compared to the cool colors in your palette. Have fun and experiment, draw grass in any scenes or landscapes that have lawns. As you move into the distance where you want less detail, shade the grass a little cooler even in the sunlit areas. Maybe use the yellow only in the foreground of your painting and let the middle ground only go to yellow green, then use the light yellow instead of yellow green in the far distance or even the aqua. When you draw grass in a scene, its texture flows together the more you stand back from the painting. Nothing is jarring in it so the eye will travel more toward strong verticals or horizontals like a door or a wall or a tree. Think of it as a mass of color and texture, then create the texture that fits it rather than try to draw every blade. You can also take a pointed scraper like a toothpick and draw in some grass blades that look finer in the foreground, that's another way I could have lightened my shadow area. Sgraffito grass effects can be beautiful, but I preferred in this example to show just what you can do with sticks alone. Grass is rarely the main player in a landscape... unless you start painting golf courses. It's essential to draw grass well where it may occupy most of the landscape and be the meaning of the painting. Watch for mowing patterns. On golf courses, alternate lighter and slightly darker patches in the regular stripes that mowing creates. Some courses have a plaid pattern, others look striped. Observe it, follow the lines carefully and let that pattern of slightly lighter, slightly darker stripes go right into the shadow areas in the foreground and maybe middle ground. Details like the mowing pattern in golf courses are important to sports paintings and paintings where the grass is a focal point. When it's not, just fill in the texture evenly and scribble shorter zigzags the farther back you go -- till you're just doing horizontal wavy lines and dots in the middle and far ground. This is a foreground texture, but in the distance you don't see blades of grass, only a smooth green area that may seem vaguely nubbly. Enjoy! You can find another art lesson on how to draw grass in Grass Texture. that demonstrates more of why it's important to use those jagged short vertical strokes instead of using any horizontal strokes to draw grass. The two articles complement each other, I'd suggest reading both and trying it for yourself. Later on I'll add some other texture articles for producing foliage, fur, bark and other natural textures. Keep in mind that for any texture, it helps to use strokes that go in the natural direction of what you're drawing whether that's curving or vertical or flowing or careful textureless shading for smooth glass or metal objects. You can also use this texture for plush and fur that stands straight up, especially fake fur on jackets, coats and toys.
|


