


|
Drawing Eggs
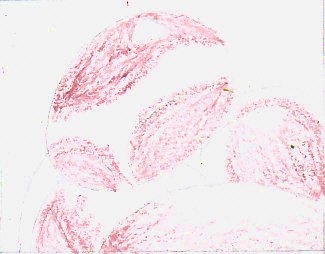
First, sketch the basic shape of an egg. I used an oval template for this sketch, but it isn't accurate for a hen's egg. The ones you find in the fridge are heavier on one end than another so they won't fall out of the nest -- this is true of almost all birds or reptiles, though the shape may vary from round to almost cylindrical. Drawing eggs of any kind relies on careful observation. Look at it as it is, not for what you think it is.

Creating an accurate egg shape is easier drawing from the negative space. Here I drew one freehand and then corrected it with some sketch lines that could easily blend into a dark background. Sketch a few eggs of different sizes, just get one from the fridge and keep drawing till you're comfortable drawing the shape exactly as it is. It will be symmetrical side to side but not top to bottom, so this takes a little practice. Another way to do it accurately is to draw one side on tracing paper, turn it over and transfer it onto your paper with a soft pencil, 2B or softer. This will produce the opposite curve on your paper and also give you graphite to flip the tracing and repeat the process to get the other side in. 
This shape is recognizably an egg, but without any modeling shadows it could as easily be a cutout as a three dimensional object. Shading it to look realistic is the same as doing a ball or any sphere. Look for the core shadow, any reflected light from nearby objects and the penumbra. The next stage for drawing eggs is to create the modeling shadow tonally. I used a charcoal pencil for these examples, but will use oil pastels for the step by step still life demonstration.

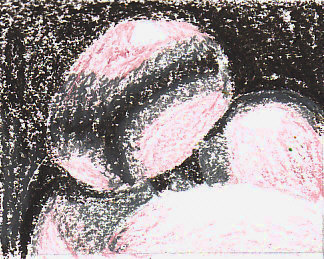
This drawing of a single egg is a little dark, because I used a charcoal pencil and needed to be sure the lighter values would scan. I set one egg out on my table in front of the cast shadow of my water bucket, then sketched it tonally with a charcoal pencil and a stump. The light side of the egg is defined as much by the dark negative space around it as by the shading on it, especially since the scan washed out my light values. The only white on the actual drawing is a small soft-edged patch of highlight at the very top of the curve. Sometimes when you're drawing eggs, even that might not be white. If I had included a shiny glass or metal object, its highlights would be a lot brighter and sharper than the highlight on the egg. I might keep the egg's value lower to show its matte texture. You can check the values in a photo or on a real object by looking at them through a gray scale value finder.

Deeper values on the object and its ground haven't changed the way this looks real. What they've done is establish a lower amount of reflected light in the room. It looks as if I drew it with only a single lightbulb at night in a dark room where there wouldn't be any reflected light except that pooled on the table. Take an egg into the bathroom, put it on a counter and turn on only a dim light. Or bring a flashlight in there and look at it with only the flashlight. The overall values are much darker and the effect will be a lot more like this drawing than like one drawn by daylight. For more about
drawing eggs
click the link, it'll take you to the HubPages article where I first used these four illustrations. I put in more detail on drawing a single egg and some text is a little humorous.
Step by Step Still Life: EggsDrawing eggs is the perfect way to do a light and color study. You can really see the color of the light you're using, the color of any reflected light from nearby objects and the values created by how strong the light is. Light from multiple sources or strong reflected light can create even more beautiful effects. Here's a photo reference for a deceptively simple still life of several eggs in a curved white container. We'll ignore the label on the outside of the plastic tub to help the composition, and create a tonal study using various oil pastels. 
For "Drawing Eggs," you'll need these materials. PaperA set of oil pastelsPencil (HB or softer)Kneaded eraser aka putty eraserTracing paperPrinter to print out the reference for tracing unless you want to just copy it freehand. Begin with a simple line sketch of the shapes in the photo. Sketch the shapes of all the shadows as well as the objects. Drawing eggs begins with drawing their shadows. To simplify the painting, I'm ignoring any of the markings on the outside of the container even though they do show inside it, but we'll shade that area smoothly dark to let the shapes define themselves within the scene. This simple still life is about light and color. I've included sketched lines for major areas of lighter and darker value within the eggs even though they're smooth soft transitions. These guidelines help in drawing eggs, but don't indent the paper when you get the lines in or that'll cause lighter incised lines to appear in the final version.

Transfer the line drawing to your paper. You may want to enlarge it. This could look very good in a large size but I can only upload images of a certain size on this site, so I'm working small. Alternately, you could copy my sketch freehand. This is much better practice for freehand drawing even if you have to try it more than once to get it. Draw lightly so it's easily erased and doesn't incise the paper. Take a kneaded eraser and gently lift any lines that have become too dark. They should only be barely visible to you, they won't show through the final oil pastels version if you get them light at this stage. Make sure the outline of that white highlight is extremely light as that may show through the light colors nearest it. Now look close at the photo reference for Drawing Eggs. Cut or punch a small hole in a piece of card and move it around the reference looking at the colors of specific areas. The slight cast of bluer or redder or greener in some areas will be important to help decide which oil pastels to blend to capture and intensify those subtle light colors. Or you could download and use Gimp, a free digital art and photo manipulation program. Photoshop has the same functions if you have it, but I know how to use Gimp for it so that's what I'll explain. Open the Drawing Eggs reference in Gimp. On the tool icons window, click the dropper selector. This will open up a color selector window when you click on the reference. It will show the exact color and value of the place you clicked. Click around the reference just seeing the colors as they are, and you will find some surprises. The bright foreshortened section of an egg at the bottom is much lighter than the lightest highlight on the whole egg. The egg next to it on the right has about the same values. All of the colors seem to lean toward blue-gray or violet-gray, but we will enhance those colors in blending the grays on Drawing Eggs rather than just shade with a blue-gray oil pastel. The background that looked so light is very dark. So let's start sketching in oil pastels. In order to get the light values strong though, I'm going to begin by using a white pastel over the entire area of the large egg at the bottom and under the strong highlights of the whole egg and the one in the back at the right. Putting white under the lightest areas will help me scrape back to them if I get them too dark and need to adjust their values. On the brightest lights I used the white heavily. Then I sketched lightly with white under all the light areas, including the reflected light coming up onto the whole egg. When I go over this with other colors, the white under them will lighten them. So now in order to have something scannable, I'll choose a color to go over these light areas for the first visible layer. Don't go over the white highlights yet at all though. A pale dusty rose Pentel is the closest color I have in value to the light areas, so I'll use that on this first layer of Drawing Eggs.
I darkened the scan a little to make the areas I colored visible. Use light tonal layers for as long as you can, so that you can build up more layers of color in combination rather than relying just on the colors of your sticks. The next areas are a blue-gray leaning toward violet, but the cool blue in my set is very bright so I'll start out with two grays and add color to them after establishing the first layers. I used the medium gray for most of the darker areas and then the darkest gray into the background and deeper ones. Going over the edges into the pink zone helped combine the colors, even if the pink isn't very visible through the gray. It will be when we bring the pink back over all the grays.
Addisg some cool colors, a turquoise and a violet, into the darks helped to balance the colors better. Cool colors push things back into the shadows, so I used them strongly into the background especially. I went over all the grays with the pink on the eggs but not the background to keep that cooler. Then I went over the pink with a very pale mint green to make it a little more neutral. It's a livelier neutral than if I'd used the lightest gray stick though, and will look even better when everything's blended. Now that the areas of light and dark are roughed in, the paper is getting fairly saturated since this isn't sanded paper. It's time to refine the values so that they are all distinct, strengthen the light values one step more and then burnish over with white again so they become smooth.

Using different colors on each of the eggs to follow the subtle variations in the light is another way to liven up this otherwise simple arrangement. Drawing eggs is tricky that way, they look like they're all the same but they're not. Even though we left out the red label, it comes through and warms up the egg to the right more than the big one. I burnished that egg almost entirely with the dull pink, then used it in some areas on the whole egg and a little around the highlight on the lower left one. I burnished more of the lower left one with light blue. I put some blue into the background and some deep violet-blue in the shadow on the background near the bottom egg. The values were too stark and dark in the last stage, but now they're starting to look better as I use burnishing layers.

Scrape off any specks of dark color that migrated into light areas. Using student grade oil pastels makes crumb control important, especially at burnishing layers where a streak of the wrong color can easily get blended in and look like an intentional patch of different color. The last burnishing layer has light gray over the mixed cools and neutrals in the background and over the center where the dark space between them shows. Burnish over the entire surface of each of the eggs with white. A little more light peach in the whole egg and on the foreground light egg at the bottom helped warm it slightly. I added a little bright yellow to the foreground egg since it looked too flat and white, but it was too strong after burnishing so I scraped off some of it at the top and burnished it again. The very soft value shifts of that big pale egg at the bottom were difficult to get right and scan well. Keep this in mind if you try Drawing Eggs at home. Test your burnishing mixtures and blended colors frequently in the scanner. If they drop out even after dropping lightness one step in Hue-Saturation, then you need to make them a little stronger. Getting it scannable doesn't usually mean getting it so dark it won't look right in person, but it's nice to be able to post your art online. Drawing Eggs is finished.

Drawing eggs may be a challenging task, but it's rewarding when your practice in mixing complementary colors, drawing soft tonal layers and blending soft edges makes your work look rich and light-filled. Enjoy!
|
