Underpainting for Oil Pastels

Underpainting is a way to make your oil pastel sketches, drawings and paintings come out richer and brighter. It adds another layer of color before you begin. Start by choosing a support that can be painted on.
I chose 140lb cold press watercolor paper for both of my demonstrations, but you can underpaint on canvas or on primed paper or boards. Be sure that whatever you use can take wet mediums, that's the important thing. Watercolor paper is the easiest for me and it's available anywhere.
An underpainting does not need to be a good painting. It can be, if you like bold garish abstracts, but it doesn't need to be. This is where you plan more or less where your basic color areas will go, and either match them or use something that'll contrast or tone them. My two examples are simple underpaintings but you can watch for more advanced lessons in using color to show how a complementary underpainting can soften and mute a serious work or give it a hidden source of zing.
Using similar colors as the final colors of your painting will make all your colors brighter. Using their opposites on the color wheel will make them softer and more muted, that's the important thing to remember. Think of it as being able to use colored paper, but change the color under different areas of the final painting.

The Easy Way using Watercolor Pencils
To me, the easiest way to do an underpainting is to grab some watercolor pencils and just scribble flat areas of color everywhere I want to paint. I used Cretacolor Aqua Monolith woodless watercolor pencils for this example and didn't go very hard with them.
I could have gotten much stronger color if I had gone over them more heavily to get more coverage, or used darker colors. Instead, I want light bright colors for this reef scene so I did my Fish Underpainting using light and medium value colors. I just sketched a loose tonal layer using a different colored pencil on each color area.
You can use regular colored pencils for this if you have Bestine rubber cement thinner or Odorless Turpentine to thin them with. Or you can use watersoluble Oil Pastels and water, or your regular oil pastels and thinner. Be sure if you're using turpentine and oil pastels that you're using a primed canvas board, canvas or other surface prepared for oil painting. Bestine or thinner and colored pencils don't seem to create as many problems for the support since colored pencils are wax based.
I did this rather small, so I used watercolor pencils instead of watersoluble oil pastels, but the principle is the same whichever you use.
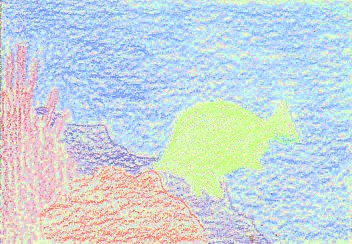
There's the Fish Underpainting dry, showing how it looks before I washed it with water. It's like doing a children's coloring book. Just fill each area with color and choose the color of pencil you want the final wash to come out as. You can use two pencils together to get a color between the two of them, like a blue one and a yellow for a mixed green. Apply them evenly if you do, the idea is to get areas of flat color.
Now I'll use a nylon brush with water in the handle to wash over my dry watercolor pencil underpainting. These are a convenience. You can use any watercolor brush and dip it in clean water for this stage, I just like my waterhandle brush because it's easier to use and doesn't need a water cup nearby.
The object of this is not to have a good painting. It's to have flat areas of color that will be painted over and detailed with oil pastels. You can even do this under colored pencils paintings and save yourself some layers filling in the white specks.
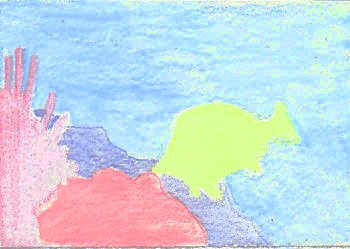
The colors may dry brighter than when you first applied them. Practice with your watercolor pencils or watersoluble oil pastels on scrap till you know what they'll do. But there's no wrong way to do it.
You don't have to exactly go up to the line or keep the edges clean. I did mostly out of practice. You don't have to get the colors right, just close. You can change your mind after this layer's done and move elements or add new ones. But from here on I'm working on colored paper and I've decided what colors the little specks in a rough stroke will be -- not bright white but a soft blue in the water area and various pinks and purples in the coral, bright yellow on that fish.
I could add orange to the fish or even reds or greens, the yellow would just make it brighter. We'll return to this underpainting in a later lesson.
The Other Way, Using Paint
Now I'll show how to do an underpainting using paint. I used watercolor, but colored ink, acrylics thinned until they're like ink and transparent, or very thin oil paint could work as well. Be sure when using oil based paint or thinner-thinned oil pastels that you prime your surface first with gesso or an acrylic primer of some kind, especially if it's paper. Oil based paints on paper damage the fibers over time and that goes for dissolved oil pastel as well since there's oil in it.
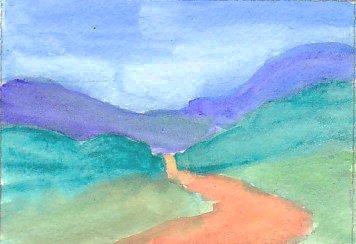
I made up this landscape while I was painting and used the watercolor to establish my composition. I decided it had a blue sky, but not whether I'll put clouds in it. I decided that there were distant hills or mountains in a layer and I worked brighter and warmer as I did layers of hills coming forward.
Whether there are trees on those hills or fields or grass is something I'll decide later on while I'm working on it. I added a road and zigged it back and forth, using a warm burnt sienna mixed with some yellow ochre to make a strong warm foreground element.
If I were doing it larger I might have added a barn or a house. This is quite small and I just swished it in using the same waterhandle brush and a Sakura Koi pan set that it came in. I didn't bother to mix my colors. This is not in itself a fine watercolor painting.
It's sloppy, loose, blobby and only hints at what it'll become when I go back with oil pastels and start pushing them around with colour shapers, working up through layers from firm ones to soft ones. It's brighter and bolder than the reef one I did earlier, showing there's a range of how bright you can make an underpainting.
You could get much brighter than this if you used colored inks or more paint in the water on a watercolor underpainting.
Using Oil Pastels for the Wash Layer
If you want to underpaint on a canvas using oil pastels themselves, scribble the colors you want on a palette. This can be a disposable one or even a wax-coated paper plate. Then swish a bristle brush soaked in odorless turpentine through the color till you've got very thin color, just a turpentine wash, and paint that directly on your canvas.
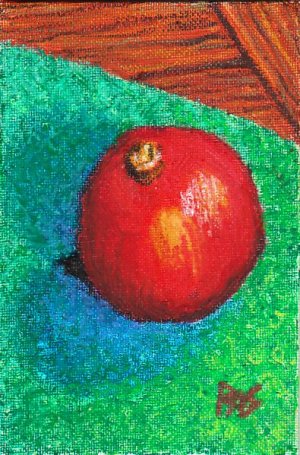
Let it dry very hard before you continue going over it, I did this under my Pomegranate painting and had a hard time getting the later layers to stick over the turpentine wash underpainting.
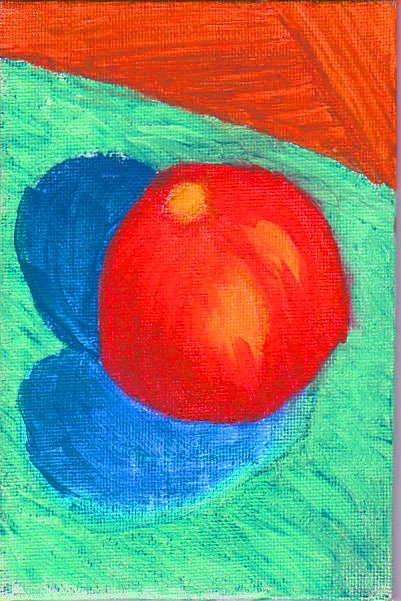
I used oil pastels directly on a canvas board the way I did the watercolor pencil underpainting, then took a stiff bristle brush and washed over it with odorless turpentine. The result is a vivid underpainting with very strong color, especially in some areas like the fruit and the wood part of the table.
I also did something a bit more sophisticated on this one. I used brush strokes to establish some shapes as if I were going to continue it as a painting. The beginnings of wood grain are there in how I brushed in the boards in the direction of the grain, and in the pomegranate followed around the shape of the fruit. That can seriously help.
When going over a light area and a dark one in the same stroke, start by dissolving the light area and then work toward the dark ones. Otherwise you can paint out the yellow highlight with the red around it, or a gold meadow with the green from the forest.
In areas where I had a very heavy application, it was harder to go over this with dry oil pastels and texture it up. I wound up doing the terry cloth texture by scribbling to create the bright green towel, and used several shades of green and a little blue-green in it.
I went into the shadows on the terry cloth with blues and purples as well as the green and softened the edges by scribbling back and forth on it. I drew more smoothly on the pomegranate itself and changed the color darker and brighter in areas with later applications.
I detailed the wood grain and defined the narrow boards strongly so that you could see the direction of the boards of the table. It came out well, but took a bit of work layering everything once I was done.
Letting the painting set up overnight helped stiffen my later applications of oil pastels too, so don't give up if using a thinned oil pastel underpainting makes it hard to add thick applications in later layers. There are many tricks for adding layers.
Still, my main point stands -- by doing a bright underpainting on this pomegranate painting, I have no white specks anywhere even if some areas have very loose applications. The scribbly towel would have been full of white flecks without it.
Try this at home with various oil pastels and different types of liquid color for underpainting. Lightfast permanent markers like wide point Pitt Artist Pens may be another convenient way to underpaint, or painting with colored inks. Anything will work as long as it's appropriate to the surface you're working on and the paint layer isn't too thick and slippery to accept oil pastels.
