


|
Sketching under Oil Pastels
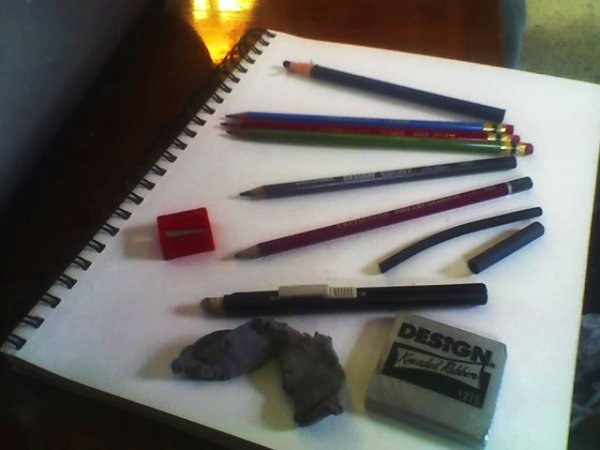
Sketching under an oil pastels painting, you'll want to use something that erases easier than oil pastels do themselves. Sketchbook drawings can be done directly in oil pastels, but under a painting it's much better to be able to make as many corrections as you need before you start in with a permanent color medium. My photo above shows some of my supplies. A large spiral bound drawing book, 9" x 12" for preliminary studies is under them to show the tools better. Top to bottom: Prang charcoal pencil (the easy kind that unwraps instead of sharpens), three erasable Sanford Col-Erase colored pencils, an Ebony pencil (darker and softer than graphite), a General's All-Art pencil sharpener (better for charcoal and pastel pencils, also cheap), a Cretacolor 9B graphite pencil, a vine charcoal stick, a compressed charcoal stick, a white vinyl stick eraser, two Design kneaded erasers. One is stretched and pulled, the other one still in its wrapper. You don't need all of these things. You do need one of the erasable drawing tools, a sharpener and a kneaded eraser as well as some paper to draw on. For serious oil pastels painting I recommend watercolor paper, museum board, all-rag mat board, oil pastels card or sanded pastel papers. You can make your own sanded pastel paper by painting Colourfix clear primer on watercolor paper -- since it's clear, it's better to do your line drawing first and then paint the clear primer over it to seal it in. I'll show a photo one of my underdrawings and my pint of clear Colourfix primer at the end. Charcoal, charcoal pencils, graphite pencils or erasable colored pencils are all good sketching tools. Be sure you also have a kneaded eraser (putty eraser) and/or white vinyl eraser. Kneaded erasers can lighten a line or remove it completely. They can be molded into shapes with fine points to pick out small details or spread flat to lift entire areas of darkness. Kneaded erasers are also an artist's best rumination tool, something like Silly Putty for grownups. When I'm deciding what to do next I often stretch, knead and mold my kneaded eraser into shapes. Sometimes I treat it like modeling clay to be able to draw from it. You'll also want a photo reference. The best photo references are the ones you take yourself with your digital camera, film camera or phone camera. Sometimes a low resolution phone-camera reference can be more useful than a super-detailed high resolution photo though. I'm going to use this photo of my sketching supplies as something to sketch.
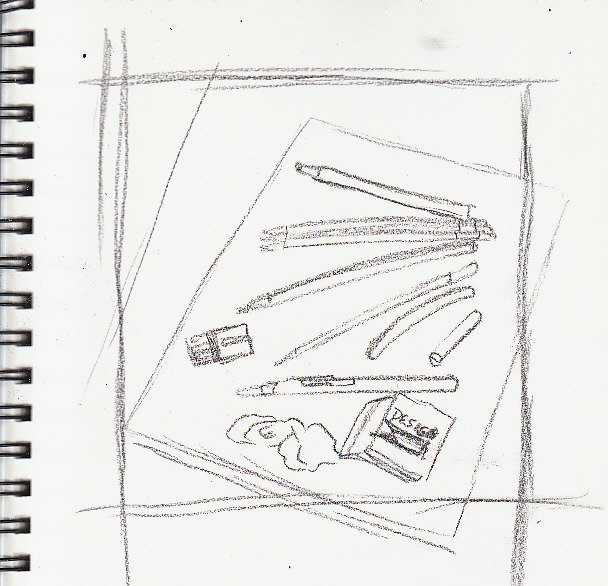
Draw quick and loose for your first try. I used my charcoal pencil for this one so that it'd show up well. Use broad motions of your arm rather than small fiddly movements of your fingers and wrists. This first sketch is a good way to limber up and decide whether you like the composition. Try a number of different versions before deciding what to do for your final painting. Preliminary studies can be just the lines or shaded in with some smudging so you can see the values. I shaded in the logo on the wrapped kneaded eraser since that's prominent enough it'd probably get in my painting. Ask yourself if you want to paint the whole thing or just part of the photo? Try thumbnails and notans. A notan reduces all the detail in the photo to areas of black, white and one or two grays. This is a good test for composition. Notan is a Japanese word for this type of preliminary drawing but a value drawing has been traditional for Western painting for a long time, as is thumbnailing. Notice that my sketch isn't perfect. My lines are not smooth and straight. I didn't use a ruler and I didn't trace from the photo. I sketched it from looking at it so that I could become familiar with everything in it before doing the outlines that I'll use on the good paper under my oil pastels painting. 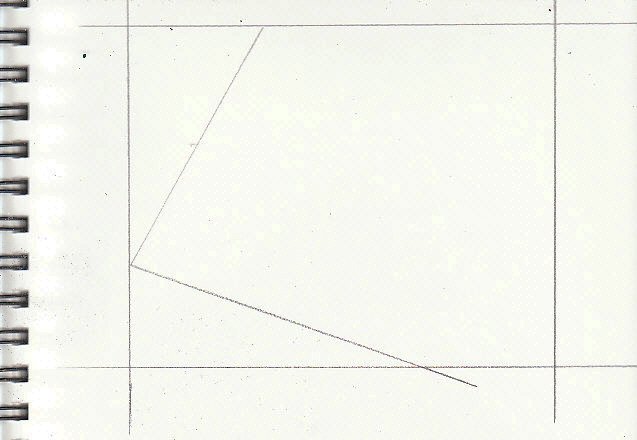
Crop your photo to create a better composition -- in this case, a simpler one with fewer things to draw, too. On screen you can do this by opening your photo in Gimp and enlarging it, then resize the window and move the slide bars till it's exactly where you want it. If you're using a printout or physical photo, move two L-shaped pieces of mat board or heavy paper around until you capture exactly the view you want. I used a grid ruler to mark off the shape of my final painting. Grid rulers are very useful for marking up because they let you create crop lines around it. Once the art gets going and the oil pastels slop over the outside edges, it's sometimes hard to tell exactly where the real edges of the picture are. Crop marks or register marks that extend out into the border help me trim the scans or photos exactly to the shape my art will have when it's matted. If you have any long straight lines in the photo reference, as I do with the side and bottom of my drawing book, those make good guidelines for placing all the objects. Estimate how far the start is from one side or the other -- is it in the middle, a third over, a quarter over? Lay the ruler there. Angle it so it's at the same angle and estimate its end point the same way along the side it connects to. Draw along the ruler when you have it lined up right. Repeat with the other line. I made a bad composition decision with this one, by using the corner as a convenient way to mark off the side. So I'm going to erase my left-side crop mark and move it away a little, either connect the dark area on the side into one or let the corner fall outside the drawing a little. When a corner exactly connects with the outline of a picture, that's called "kissing." It can distract the viewer's attention from what's in the picture to the outside line. This kind of decision is why your kneaded eraser and white vinyl eraser are so important. Art gum or white vinyl erasers take up all of the pencil without damaging the paper. I'm getting a finer line with the pencil than I did with the charcoal but I'm going to have to erase a line now, so I'm glad I didn't press hard! 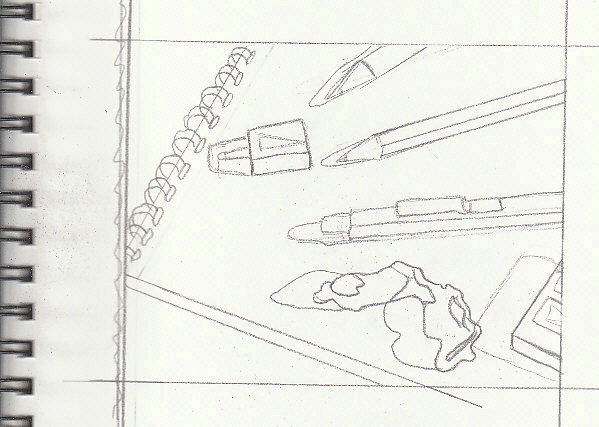
For your final version, the one that'll be primed and painted over, don't hesitate to make changes. Erase, move things, change things from how they are in the photo. Think about composition while you do. My red pencil sharpener is the brightest object in this little still life. It's sitting at one of four primo focal point places by the Rule of Thirds. If you draw two lines across and two lines evenly on a painting dividing it into nine rectangles, the places those lines cross are all good focal points. They are the best places to put the main attention getter -- which for this still life would be that bright red pencil sharpener. You don't actualy have to draw those guidelines, you can just lay a couple of rulers or strings across your drawing to see where the focal points are. You also don't have to use Rule of Thirds. It's just an easy way to get a good balanced composition that you know will work -- like many rules in art, you can break it with spectacular results once you understand why it's there. Rule of Thirds is almost a cheat to getting a good composition, but it's so common people don't think of it that way. Draw the outlines of the objects and the outlines of their cast shadows and modeling shadows. Cast shadows are the shadows the things make on the surface they're on or next to. Modeling shadows are the shadows on the object that show it's rounded or solid. Both types of shadows are needed to make anything look three dimensional -- the cast shadows add a lot of interest and can look cool as distorted flat versions of the objects. This is called a Contour Drawing. If you ever had to do funny looking contour drawings in art class the way I did, this is why. You can put them on a canvas or a piece of pastel paper and treat them like a paint-by-numbers to get a beautiful painting. Move the crop lines until you have it just right. I moved my crop line out a bit, then in a bit, then finally changed where the corner went and had it extend outside after all. Make as many changes as you want. If you do your contour painting in a sketchbook the way I just did, you can use tracing paper to transfer it to your good watercolor paper before priming. You can also take the short cut of enlarging your own photo, printing it out on printer paper and tracing it for the outlines of the shapes and shadows. That's not cheating either -- it's practice. Half of learning to draw is learning to see. If you get more accuracy in a contour drawing by tracing an enlarged photo and it's your own photo -- well, you created that photo too and it's still your concept for the painting. Many prominent realists use cameras to do this. Others use opaque projectors to copy their photos or sketches onto good paper. A tool is a tool, it's only as good as the skilled hand that uses it. You have permission to copy both my photo and my sketch to paint, as long as you credit me for both my photo and the sketch and include a link to this website or this page when you post it online. Don't claim you took the photo or did the sketch and we're good. After tracing and copying your sketch onto good paper or watercolor paper, you may want to prime it with Colourfix sanded pastel primer. As promised, here's a photo of my 250ml plastic jar of Colourfix clear sanded primer, the 3/4" synthetic flat watercolor brush I usually use to apply it, a jar of water and a one inch wide foam brush. Many artists prefer using a foam brush for a smoother application. I sometimes put low tack artist's tape around the edges of my final contour drawing, right up to the outlines, so that the primer won't get on the borders at all. I leave that tape on till I'm done painting and when I peel it off, my paintings have clean edges. I like that, it's a personal quirk. Others like to leave a ragged edge around a painting and may even mat it to show some of the blank paper around the ragged edge. Get your brush thoroughly wet before priming. Stir the jar of primer with a toothpick or coffee stirrer. Dip the brush only about a third of the way up the bristles so the primer never gets near the ferrule (metal bit that holds the hairs). Never let your brush dry out, rinse it every couple of strokes and squeeze the primer out with a rag before continuing. Acrylic primer or paint can ruin a brush if you let it dry on the hairs. Paint over the contour drawing on watercolor paper with smooth even strokes that overlap a little, about 1/4" or more. Go horizontal or vertical first, covering the whole contour drawing with a thin coat. Let that dry and then go the opposite direction with another thin coat. That should be enough that when it dries it has a nice sandy surface just like Colourfix sanded pastel paper -- but it's got your sketch handy! If you want to do an underpainting, paint the contour sketch with watercolors or very thin acrylic paint before putting the clear primer on. You can also just tone your paper with a smooth wash of watercolor or thin acrylic before transfering the contour sketch to it. Since the primer comes in 20+ colors. You can even use the colored primer on the background, say, black if it's got a very dark background and then clear over the detailed contour drawing with the foreground object. But that's a little fancy -- all you really need is the clear sanded primer and a good contour drawing with or without underpainting. 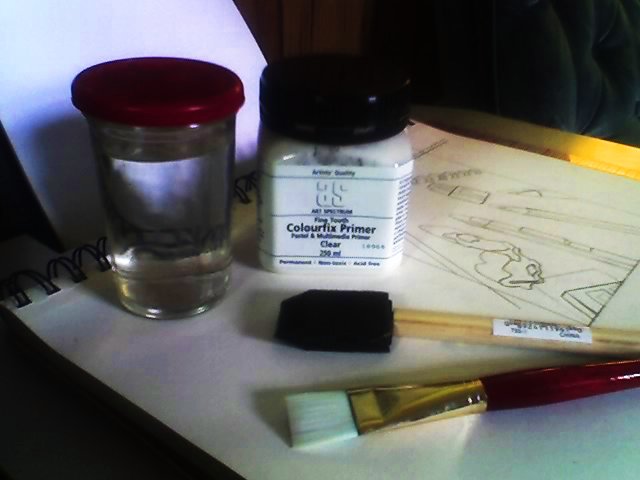
|
