|
Line
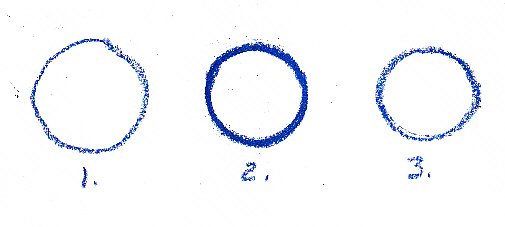
Of course you can. Use a ruler. When you want to draw anything else, freehand drawing is a matter of habit, observation and practice. Seeing line in three dimensional objects is looking at their edges. Not at the shapes you think things are, but the edges as you see them from your exact point of view -- how close you are, what angle you are looking up or down, combined with the fact that you're seeing something different from each eye anyway. Binocular vision combines two very different images to give depth. So the exact edges of something you want to draw are going to have a certain amount of elbow room between what your right eye sees and your left anyway. This means line drawing takes a lot of practice. It often starts with ideas rather than observed objects. When you want a circle, it's possible to use a template with circular openings or draw around a round object without moving it. That'll give a clean true circle as long as you're careful. Try drawing one freehand and then draw one using a template. Then draw a third while you have the good one from the template to look at. I used a good dark color so they'd scan well. Even with years of practice sketching, #1 is much more lopsided than #3, a freehand circle drawn while looking at the one I drew using a circle template. Also, my hand shifted on the template while I was drawing #2 so I had to push it back into place and go over it a couple of times to even it out. If you draw a lot of circles while warming up before trying to draw something circular, you will get better results on the good sketch. Practice isn't just for the long term. It can help anytime. Getting used to drawing accurate outlines is a lifelong study and it's rare even for artists to get it perfect. Michelangelo was capable of the trick and that's what won him the Sistine Chapel commission. Few others can manage, but templates and compasses aren't expensive and are much faster to learn. 
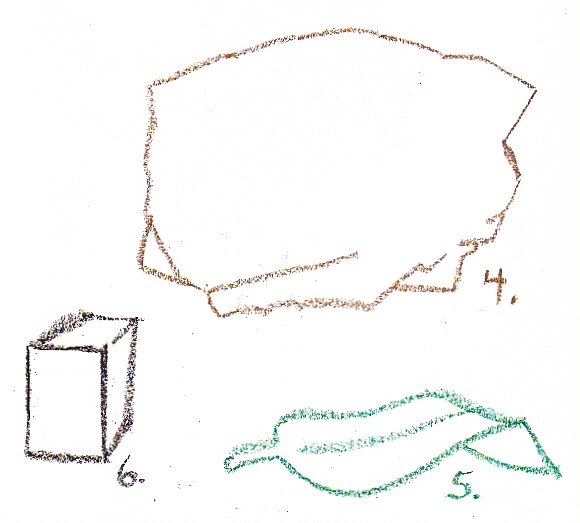
Irregular LinesMost of the time when you're drawing, lines will neither be perfect curves or ruler-clean straight. They'll be irregular with proportions as accurate as you can make them. #4 is the outline of a rock that I've already painted once as a small study by itself. It's more accurate because this is the second time I've drawn it. If I really wanted to understand that complex irregular shape in depth, I would draw it a dozen times the way I did with one rose my daughter gave me as a challenge. Color doesn't matter to these exercises, so copy them in any color you like to keep from getting bored. As long as there's enough contrast to see what you're doing, good enough. Try it again if there isn't, that'll help you find out how much contrast you need to tell what you're doing in your sketchbook. It could matter a lot when you're doing the contour drawing under an oil pastel painting and trying to keep the outlines close to the final color you'll use. #5 is a leaf shape done from memory. I practiced this type of leaf shape both from life and from medieval manuscripts thousands of times, so mine is reasonably graceful. Feel free to repeat it many times as the sketch for a decorative painting project, it's a good leaf for decorative painting. If you draw it freehand and alternate with leaf shapes that don't have flipped over tips, it'd look very natural by the variations every time you draw it. #6 is a boxlike shape. Again, depth is established just using lines in perspective. If I were drawing from a real block, I would be looking at the edges between planes of color on the top, side and bottom. Angles are important to getting this type of object to look right. If the angles are off it can seem very distorted and lose that 3-D effect. We'll go into that in Perspective later on.

Try doing something like #4 without copying one of my drawings. Choose a simple object with irregular outlines and set it in front of you. Don't move it. Put it at an angle it looks interesting and prop it up if you have to. Then draw the edges of that object and if there are any lines like the cracks I showed on my rock, sketch them in too. Draw it as many times as you need to in order to get it accurate to the point you can recognize what it is. Corrected Lines
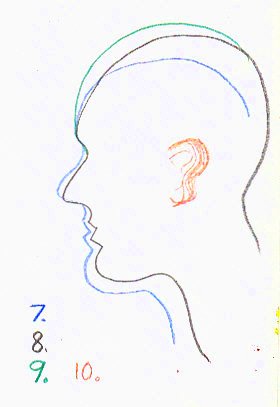
My next illustration shows a common process that almost all sketchers do with outlines. I used different colors of Col-Erase colored pencils for the example to show the stages. All those wrong lines can be erased when you do a sketch like this. If it's too dirty, just trace the good lines from the sketch and use that version. #7 is an imaginary profile I got down just any old way. I wasn't looking at either manikin's profile or a photo reference or a person, just relying on my memory of profile shapes and getting it down. I wasn't careful. I looked back at its misproportions. I could have expanded the forehead and changed the nose shape, or reduced the chin and changed the nose shape and expanded the top and back of the head. In #8, I chose the latter to keep it on the page, it's in a small sketchbook. I looked at #8 critically and realized I had sloped the forehead back -- the top of the head, neck and back of head were now in proportion and the nose/mouth shape was better, but she looked as if she had her forehead bound with a board like some tribal people once did. #9 is the second correction with a green pencil to show an accurate forehead proportion for someone whose head isn't flattened artificially. #10 is her ear placed more or less accurately, drawn the way a heavily corrected sketch line will look for real in most sketchbooks. The line will become thick and thin with multiple correction lines. Sometimes the outside of the widened line is the good one, sometimes the inside. It doesn't matter as long as you remember or can see which parts of the line should be copied on the inside or outside. This demonstration shows exactly why it's a good idea to do many sketches of something you want to do a serious painting from. The more often you sketch it, the more changes you make to the sketches, the more accurate your outlines will be. In the end, transfer your best sketch to the good support you'll use for your painting and leave out any bad lines you corrected. It sounds simple. It takes practice more than anything else. Draw things often, draw anything that you notice whether it's hard or easy. Sometimes easy things turn out to be hard when you try them, like getting the shape of eyeglass lenses. Sometimes seemingly hard things like getting a leaf shape right can turn out to be easy. This type of line drawing is called a Contour Drawing and it is a natural stage in almost all paintings. I will usually do my contour drawing on watercolor paper with a graphite pencil or Col-Erase erasable colored pencil. I'll erase any mistakes with a kneaded putty eraser. Then seal the final contour drawing with a light spray of workable matte fixative and prime over it with two thin coats of clear Colourfix primer. Sometimes in between I'll tone the page with a transparent watercolor or thin acrylic wash that still lets the lines show. This contour drawing becomes a good foundation for my painting -- and the rest of the painting process becomes a lot like playing with a coloring book, adult style. You make up what's on the page though, when you get to be a grownup artist with a sketchbook. That's what makes all the difference. Over time, you may notice yourself learning how to change the lines and thus the shapes and dimensions of what you're drawing. You may want to make the flower in the vase taller than it is so that it fits better in the shape of the painting. You may want to give a character in a painting a bigger nose than the model, or you may decide to put two small leaves where one big one is there on the real branch. That kind of change comes easily once you have enough contour drawing practice. I did that folded leaf as fast as I could move my hand because when I was a little kid, I saw a design like that on a photo of a medieval manuscript. I drew leaf and grape borders with flipped tips on every letter I sent anyone, friend or relative, pretending to be a medieval monk. So this is where to spend good time with your sketchbook every day if you can. Don't worry about mistakes other than to keep trying till your line drawings come out better. Improvement is natural with every trial. Pay more attention to your favorite subjects, the things you want to learn to draw very well are the ones to draw over and over till they start looking good even in the line drawing. Copy photos, especially the ones that you take for yourself. Nearly every artist today uses a camera and there are good books of artist's photo references available if you aren't happy with the quality of your photography. Line drawings from photos tend to become accurate over time with a lot of practice -- but always remember to keep all the versions because a mistake can turn into serendipity. If you put the horizon too high in your line drawing of a beach with a bird on it, you may look back when it's time to paint and decide that's a good place for the horizon to stay. Then use the other sketch for the bird, the one that has the best bird outline and might be from a different photo. This is another advantage of trace and transfer over sketching directly on your good support. You won't wear out that pastel paper or canvas with repeated erasing and you will be able to combine the best versions of every element in the painting from your sketchbook. Another useful tool for this is an opaque projector. That way if your best sketch of the bird is a bit too small for the best beach umbrella sketch to go with it, when you transfer you can adjust where the projector is to get the bird placed right at the right size. Even an inexpensive one can be handy that way. If not, my lesson on Proportion will show two different ways of scaling a line drawing larger or smaller without expensive equipment. Have fun with your sketchbook. Also keep a pencil and doodle pad in your pocket for random moments when you're sitting on hold or in the bathroom, waiting in a doctor's office or stuck in traffic (if you're a passenger). The more often you do small fast line drawings, the deeper your control of line will grow until it becomes second nature to draw whatever you see as you see it... and even what you only see in your mind. I'm just reaching the point where sometimes I can draw well just from memory. It's a more difficult trick than drawing what's right in front of me. That will come too in time -- and the more practice I get with any specific subject, the easier it is to remember its outlines well enough to draw it.
|


